
Contract Driven REST Services with Vert.x3
We see a new trend in development where we are shifting from developing applications to develop APIs. More and more we see services being offered as REST APIs that we are allowed to consume and we already see this trend from the big names in the industry, e.g.: Facebook, Wikipedia, Amazon, Twitter, Google and Reddit they all offer APIs.
Of course making an REST API using Vert.x is quite simple, just use Vert.x Web and you can start writing your API in seconds, however an API without documentation is not an API since no developer will know how to use it. However this is one of the most sensitive issues to tackle in software development, nobody likes to write documentation. However, in the REST age where REST-based web-services are ubiquitous, documentation for public web-services is a necessity. There are a lot of tools out there, two of the most popular are without a doubt:
Both frameworks have a large ecosystem of tools and tooling around but they tackle the documentation from two different perspectives. While Swagger is purely a documentation tool it tackles the problem from bottom up and RAML does document top down. They both rely on a document (JSON for Swagger, YAML for RAML).
I’ll now go over building a simple Hello World API, document it and test it. For this example I’ll choose RAML since it feels more natural to the way we code with Vert.x Web.
Define the Hello World API
We need a contract and as with any other development we need some specification, You can learn about RAML in its website and quickly see how easy it is to get started. So we start with the following specification:
#%RAML 0.8
title: Hello world REST API
baseUri: http://localhost:8080/
version: v1
/hello:
  get:
    responses:
      200:
        body:
          application/json:
            schema: |
              { "$schema": "http://json-schema.org/schema",
                "type": "object",
                "description": "Hello World Greeting",
                "properties": {
                  "greeting":  { "type": "string" }
                },
                "required": [ "greeting" ]
              }
So if you didn’t understood why I named RAML as a top down documentation tool, I think it becomes clear now. So there are some basic definition on the top of the file like, title, baseUri and version which should be self explanatory.
And then we start with the API documentation, so we specify that at the URL /hello using the HTTP verb GET you are expected to get a response with status code 200 and the body of the response should have content type application/json. This is a very minimal document, one could go over and specify the json schema for the response, input values, etc…, however lets just keep it simple for this example.
| IDE ? if you do not like to write yaml in your editor you can always use the API Designer which gives you instant feedback on your API document and provides a testing platform |
Implement the API
So you got your contract, time to implement it, this is a very simple API so I’ll jump to the code immediately:
public class App extends AbstractVerticle {
  @Override
  public void start() {
    Router router = Router.router(vertx);

    router.get("/hello").handler(rc -> {
      rc.response()
          .putHeader("content-type", "application/json")
          .end(new JsonObject().put("greeting", "Hello World!").encode());
    });

    vertx.createHttpServer().requestHandler(router::accept).listen(8080);
  }
}
As you can see the code resembles the contract document, when there is a GET request to /hello we send to the client a empty JSON document {}.
Are we done?
The answer is NO!!! how can we be sure that our implementation does comply to the contract? We need to test. As I wrote before there is no specific support for Vert.x from RAML or other tools however in this case it is not a problem we can still test our code without having the need to implement a test framework from the ground up.
Testing our contract
The initial step is to setup a test, this should be trivial we are using Java (although we could test any of Vert.x supported languages using the same technique). We create a JUnit unit test.
| JUnit ? ! For this example I will be using JUnit instead of Vert.x Test mostly to let you know that Vert.x isn’t an opinionated framework, so you are free to choose the tool that best fits you. |
public class APITest {

  @BeforeClass
  public static void bootApp() {
    Runner.run(App.class);
  }

  @Test
  public void testHelloEndpoint() {
  }
}
So at this moment you have a simple test, I’ll share the code of the runner class (basically it just instantiates a Vertx instance and load the verticle we just implemented above) and has a empty test testHelloEndpoint.
Load the API definition into the test
public class APITest {

  private static final RamlDefinition api = RamlLoaders.fromClasspath()
        .load("/api/hello.raml")
        .assumingBaseUri("http://localhost:8080/");

  private CheckingWebTarget checking;

  ...
}
So the first step is to load the API definition into our test and have a reference to a CheckingWebTarget object. The checking object is where you can perform assertions, but to do this we need some client make REST calls in order to test.
Create a REST client
There are many options for this, you could use JAX-RS, RestAssured, RestEasy, etc… so I’ll pick RestEasy for now:
public class APITest {

  private static final RamlDefinition api = RamlLoaders.fromClasspath()
      .load("/api/hello.raml")
      .assumingBaseUri("http://localhost:8080/");

  private ResteasyClient client = new ResteasyClientBuilder().build();
  private CheckingWebTarget checking;

  @BeforeClass
  public static void bootApp() {
    Runner.run(App.class);
  }

  @Before
  public void createTarget() {
    checking = api.createWebTarget(client.target("http://localhost:8080"));
  }

  ...
}
Implement the test
All of the boilerplate code is in place and if you look at the previous section you will see that it wasn’t that bad, just a few lines and you loaded the RAML contract, created a REST client and started up your application and all this under ~10 lines of code.
So lets finish and implement the verification of the contract:
public class APITest {
  ...

  @Test
  public void testHelloEndpoint() {
    checking.path("/hello").request().get();
    Assert.assertThat(checking.getLastReport(), RamlMatchers.hasNoViolations());
  }
}
Once you run your tests, you will see:
13:09:28.200 [main] DEBUG o.a.h.i.conn.DefaultClientConnection - Sending request: GET /hello HTTP/1.1
13:09:28.201 [main] DEBUG org.apache.http.wire -  >> "GET /hello HTTP/1.1[\r][\n]"
13:09:28.202 [main] DEBUG org.apache.http.wire -  >> "Accept-Encoding: gzip, deflate[\r][\n]"
13:09:28.202 [main] DEBUG org.apache.http.wire -  >> "Host: localhost:8080[\r][\n]"
13:09:28.202 [main] DEBUG org.apache.http.wire -  >> "Connection: Keep-Alive[\r][\n]"
13:09:28.202 [main] DEBUG org.apache.http.wire -  >> "[\r][\n]"
13:09:28.202 [main] DEBUG org.apache.http.headers - >> GET /hello HTTP/1.1
13:09:28.202 [main] DEBUG org.apache.http.headers - >> Accept-Encoding: gzip, deflate
13:09:28.203 [main] DEBUG org.apache.http.headers - >> Host: localhost:8080
13:09:28.203 [main] DEBUG org.apache.http.headers - >> Connection: Keep-Alive
13:09:28.412 [main] DEBUG org.apache.http.wire -  << "HTTP/1.1 200 OK[\r][\n]"
13:09:28.413 [main] DEBUG org.apache.http.wire -  << "content-type: application/json[\r][\n]"
13:09:28.413 [main] DEBUG org.apache.http.wire -  << "Content-Length: 2[\r][\n]"
13:09:28.413 [main] DEBUG org.apache.http.wire -  << "[\r][\n]"
13:09:28.414 [main] DEBUG o.a.h.i.conn.DefaultClientConnection - Receiving response: HTTP/1.1 200 OK
13:09:28.414 [main] DEBUG org.apache.http.headers - << HTTP/1.1 200 OK
13:09:28.415 [main] DEBUG org.apache.http.headers - << content-type: application/json
13:09:28.415 [main] DEBUG org.apache.http.headers - << Content-Length: 2
13:09:28.429 [main] DEBUG org.apache.http.wire -  << "{}"
Tests run: 1, Failures: 0, Errors: 0, Skipped: 0, Time elapsed: 1.076 sec

Results :

Tests run: 1, Failures: 0, Errors: 0, Skipped: 0
And we are done, we now have a API that follow the contract, you can now keep developing your API and implementation and have a test driven approach to be sure that the contract is not broken.
Next steps
Until now you have learn how to integrate RAML into Vert.x and CI, however the users of your API will not be able to know much about the API yet since its documentation is not publicly available. So lets publish online the documentation of your API, of course if your API is private you do not need to follow these steps.
In order to do this all we need it to include in our application the RAML console, the fastest way to do this is just download a release to src/main/resouces/webroot and in the original application [Vert.x Router] we add a Static Content Handler to serve the console files. Your application source code should look like this:
public class App extends AbstractVerticle {
@Override
public void start() {
Router router = Router.router(vertx);
router.get("/hello").handler(rc -> {
rc.response()
.putHeader("content-type", "application/json")
.end(new JsonObject().put("greeting", "Hello World!").encode());
});
// optionally enable the web console so users can play with your API
// online from their web browsers
router.route().handler(StaticHandler.create());
vertx.createHttpServer().requestHandler(router::accept).listen(8080);
}
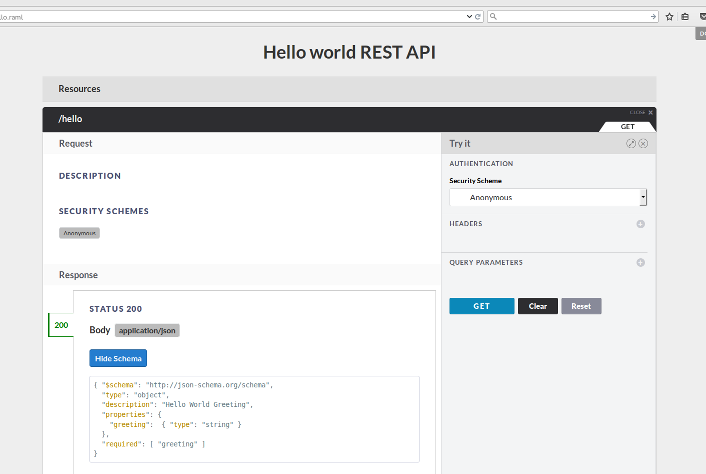
}Once you start you application open a browser pointing at the console. Once you do that you should be presented with something similar to this:
Article source code
You can get the full source code for this article here.