
Vert.x 蓝图 - 待办事项服务开发教程
前言
在本教程中,我们会使用 Vert.x 来一步一步地开发一个REST风格的Web服务 - Todo Backend,你可以把它看作是一个简单的待办事项服务,我们可以自由添加或者取消各种待办事项。
通过本教程,你将会学习到以下的内容:
- Vert.x 是什么,以及其基本设计思想
Verticle是什么,以及如何使用Verticle- 如何用 Vert.x Web 来开发REST风格的Web服务
- 异步编程风格 的应用
- 如何通过 Vert.x 的各种组件来进行数据的存储操作(如 Redis 和 MySQL)
本教程是 Vert.x 蓝图系列 的第一篇教程,对应的Vert.x版本为3.4.1。本教程中的完整代码已托管至GitHub。
注:代码已更新至 3.5.x 版本,并重构为响应式编程模式,利用 Vert.x RxJava 2 API 编写。文档待更新。。。
踏入Vert.x之门
朋友,欢迎来到Vert.x的世界!初次听说Vert.x,你一定会非常好奇:这是啥?让我们来看一下Vert.x的官方解释:
Vert.x is a tool-kit for building reactive applications on the JVM.
(⊙o⊙)哦哦。。。翻译一下,Vert.x是一个在JVM上构建 响应式 应用的 工具集 。这个定义比较模糊,我们来简单解释一下:工具集 意味着Vert.x非常轻量,可以嵌入到你当前的应用中而不需要改变现有的结构;另一个重要的描述是 响应式 —— Vert.x就是为构建响应式应用(系统)而设计的。响应式系统这个概念在 Reactive Manifesto 中有详细的定义。我们在这里总结4个要点:
- 响应式的(Responsive):一个响应式系统需要在 _合理_ 的时间内处理请求。
- 弹性的(Resilient):一个响应式系统必须在遇到 _异常_ (崩溃,超时,
500错误等等)的时候保持响应的能力,所以它必须要为 异常处理 而设计。 - 可伸缩的(Elastic):一个响应式系统必须在不同的负载情况下都要保持响应能力,所以它必须能伸能缩,并且可以利用最少的资源来处理负载。
- 消息驱动:一个响应式系统的各个组件之间通过 异步消息传递 来进行交互。
Vert.x是 事件驱动的,同时也是非阻塞的。首先,我们来介绍 Event Loop 的概念。Event Loop是一组负责分发和处理事件的线程。注意,我们绝对不能去阻塞Event Loop线程,否则事件的处理过程会被阻塞,我们的应用就失去了响应能力。因此当我们在写Vert.x应用的时候,我们要时刻谨记 异步非阻塞开发模式 而不是传统的阻塞开发模式。我们将会在下面详细讲解异步非阻塞开发模式。
我们的应用 - 待办事项服务
我们的应用是一个REST风格的待办事项服务,它非常简单,整个API其实就围绕着 增删改查 四种操作。所以我们可以设计以下的路由:
- 添加待办事项:
POST /todos - 获取某一待办事项:
GET /todos/:todoId - 获取所有待办事项:
GET /todos - 更新待办事项:
PATCH /todos/:todoId - 删除某一待办事项:
DELETE /todos/:todoId - 删除所有待办事项:
DELETE /todos
注意我们这里不讨论REST风格API的设计规范(仁者见仁,智者见智),因此你也可以用你喜欢的方式去定义路由。
下面我们开始开发我们的项目!High起来~~~
说干就干!
Vert.x Core提供了一些较为底层的处理HTTP请求的功能,这对于Web开发来说不是很方便,因为我们通常不需要这么底层的功能,因此Vert.x Web应运而生。Vert.x Web基于Vert.x Core,并且提供一组更易于创建Web应用的上层功能(如路由)。
Gradle配置文件
首先我们先来创建我们的项目。在本教程中我们使用Gradle作为构建工具,当然你也可以使用其它诸如Maven之类的构建工具。我们的项目目录里需要有:
src/main/java文件夹(源码目录)src/test/java文件夹(测试目录)build.gradle文件(Gradle配置文件)
.
├── build.gradle
├── settings.gradle
├── src
│   ├── main
│   │   └── java
│   └── test
│       └── java
我们首先来创建 build.gradle 文件,这是Gradle对应的配置文件:
apply plugin: 'java'

targetCompatibility = 1.8
sourceCompatibility = 1.8

repositories {
  jcenter()
}

dependencies {

  compile "io.vertx:vertx-core:3.4.1"
  compile 'io.vertx:vertx-web:3.4.1'

  testCompile 'io.vertx:vertx-unit:3.4.1'
  testCompile group: 'junit', name: 'junit', version: '4.12'
}
你可能不是很熟悉Gradle,这不要紧。我们来解释一下:
- 我们将
targetCompatibility和sourceCompatibility这两个值都设为1.8,代表目标Java版本是Java 8。这非常重要,因为Vert.x就是基于Java 8构建的。 - 在
dependencies中,我们声明了我们需要的依赖。vertx-core和vert-web用于开发REST API。
搞定build.gradle以后,我们开始写代码!
待办事项对象
首先我们需要创建我们的数据实体对象 - Todo 实体。在io.vertx.blueprint.todolist.entity包下创建Todo类,并且编写以下代码:
package io.vertx.blueprint.todolist.entity;

import io.vertx.codegen.annotations.DataObject;
import io.vertx.core.json.JsonObject;

import java.util.concurrent.atomic.AtomicInteger;


@DataObject(generateConverter = true)
public class Todo {

  private static final AtomicInteger acc = new AtomicInteger(0); // counter

  private int id;
  private String title;
  private Boolean completed;
  private Integer order;
  private String url;

  public Todo() {
  }

  public Todo(Todo other) {
    this.id = other.id;
    this.title = other.title;
    this.completed = other.completed;
    this.order = other.order;
    this.url = other.url;
  }

  public Todo(JsonObject obj) {
    TodoConverter.fromJson(obj, this); // 还未生成Converter的时候需要先注释掉,生成过后再取消注释
  }

  public Todo(String jsonStr) {
    TodoConverter.fromJson(new JsonObject(jsonStr), this);
  }

  public Todo(int id, String title, Boolean completed, Integer order, String url) {
    this.id = id;
    this.title = title;
    this.completed = completed;
    this.order = order;
    this.url = url;
  }

  public JsonObject toJson() {
    JsonObject json = new JsonObject();
    TodoConverter.toJson(this, json);
    return json;
  }

  public int getId() {
    return id;
  }

  public void setId(int id) {
    this.id = id;
  }

  public void setIncId() {
    this.id = acc.incrementAndGet();
  }

  public static int getIncId() {
    return acc.get();
  }

  public static void setIncIdWith(int n) {
    acc.set(n);
  }

  public String getTitle() {
    return title;
  }

  public void setTitle(String title) {
    this.title = title;
  }

  public Boolean isCompleted() {
    return getOrElse(completed, false);
  }

  public void setCompleted(Boolean completed) {
    this.completed = completed;
  }

  public Integer getOrder() {
    return getOrElse(order, 0);
  }

  public void setOrder(Integer order) {
    this.order = order;
  }

  public String getUrl() {
    return url;
  }

  public void setUrl(String url) {
    this.url = url;
  }

  @Override
  public boolean equals(Object o) {
    if (this == o) return true;
    if (o == null || getClass() != o.getClass()) return false;

    Todo todo = (Todo) o;

    if (id != todo.id) return false;
    if (!title.equals(todo.title)) return false;
    if (completed != null ? !completed.equals(todo.completed) : todo.completed != null) return false;
    return order != null ? order.equals(todo.order) : todo.order == null;

  }

  @Override
  public int hashCode() {
    int result = id;
    result = 31 * result + title.hashCode();
    result = 31 * result + (completed != null ? completed.hashCode() : 0);
    result = 31 * result + (order != null ? order.hashCode() : 0);
    return result;
  }

  @Override
  public String toString() {
    return "Todo -> {" +
      "id=" + id +
      ", title='" + title + '\'' +
      ", completed=" + completed +
      ", order=" + order +
      ", url='" + url + '\'' +
      '}';
  }

  private <T> T getOrElse(T value, T defaultValue) {
    return value == null ? defaultValue : value;
  }

  public Todo merge(Todo todo) {
    return new Todo(id,
      getOrElse(todo.title, title),
      getOrElse(todo.completed, completed),
      getOrElse(todo.order, order),
      url);
  }
}
我们的 Todo 实体对象由序号id、标题title、次序order、地址url以及代表待办事项是否完成的一个标识complete组成。我们可以把它看作是一个简单的Java Bean。它可以被编码成JSON格式的数据,我们在后边会大量使用JSON(事实上,在Vert.x中JSON非常普遍)。同时注意到我们给Todo类加上了一个注解:@DataObject,这是用于生成JSON转换类的注解。
@DataObject注解
被
@DataObject注解的实体类需要满足以下条件:拥有一个拷贝构造函数以及一个接受一个JsonObject对象的构造函数。
我们利用Vert.x Codegen来自动生成JSON转换类。我们需要在build.gradle中添加依赖:
compileOnly 'io.vertx:vertx-codegen:3.4.1'由于Vert.x Codegen仅在编译期生成代码,因此我们这里使用了compileOnly(相当于Maven中的provided。需要Gradle 2.12及以上版本)。同时,我们需要在io.vertx.blueprint.todolist.entity包中添加package-info.java文件来指引Vert.x Codegen生成代码:
/**
 * Indicates that this module contains classes that need to be generated / processed.
 */
@ModuleGen(name = "vertx-blueprint-todo-entity", groupPackage = "io.vertx.blueprint.todolist.entity")
package io.vertx.blueprint.todolist.entity;

import io.vertx.codegen.annotations.ModuleGen;
Vert.x Codegen本质上是一个注解处理器(annotation processing tool),因此我们还需要在build.gradle中配置apt。往里面添加以下代码:
task annotationProcessing(type: JavaCompile, group: 'build') {
  source = sourceSets.main.java
  classpath = configurations.compile + configurations.compileOnly
  destinationDir = project.file('src/main/generated')
  options.compilerArgs = [
    "-proc:only",
    "-processor", "io.vertx.codegen.CodeGenProcessor",
    "-Acodegen.output=${destinationDir.absolutePath}"
  ]
}

sourceSets {
  main {
    java {
      srcDirs += 'src/main/generated'
    }
  }
}

compileJava {
  targetCompatibility = 1.8
  sourceCompatibility = 1.8

  dependsOn annotationProcessing
}
这样,每次我们在编译项目的时候,Vert.x Codegen都会自动检测含有 @DataObject 注解的类并且根据配置生成JSON转换类。在本例中,我们应该会得到一个 TodoConverter 类,然后我们可以在Todo类中使用它。
Verticle
下面我们来写我们的应用组件。在io.vertx.blueprint.todolist.verticles包中创建SingleApplicationVerticle类,并编写以下代码:
package io.vertx.blueprint.todolist.verticles;

import io.vertx.core.AbstractVerticle;
import io.vertx.core.Future;
import io.vertx.redis.RedisClient;
import io.vertx.redis.RedisOptions;

public class SingleApplicationVerticle extends AbstractVerticle {

  private static final String HTTP_HOST = "0.0.0.0";
  private static final String REDIS_HOST = "127.0.0.1";
  private static final int HTTP_PORT = 8082;
  private static final int REDIS_PORT = 6379;

  private RedisClient redis;

  @Override
  public void start(Future<Void> future) throws Exception {
      // TODO with start...
  }
}我们的SingleApplicationVerticle类继承了AbstractVerticle抽象类。那么什么是 Verticle 呢?在Vert.x中,一个Verticle代表应用的某一组件。我们可以通过部署Verticle来运行这些组件。如果你了解 Actor 模型的话,你会发现它和Actor非常类似。
当Verticle被部署的时候,其start方法会被调用。我们注意到这里的start方法接受一个类型为Future<Void>的参数,这代表了这是一个异步的初始化方法。这里的Future代表着Verticle的初始化过程是否完成。你可以通过调用Future的complete方法来代表初始化过程完成,或者fail方法代表初始化过程失败。
现在我们Verticle的轮廓已经搞好了,那么下一步也就很明了了 - 创建HTTP Client并且配置路由,处理HTTP请求。
Vert.x Web与REST API
创建HTTP服务端并配置路由
我们来给start方法加点东西:
@Override
public void start(Future<Void> future) throws Exception {
  initData();
  Router router = Router.router(vertx); // <1>
  // CORS support
  Set<String> allowHeaders = new HashSet<>();
  allowHeaders.add("x-requested-with");
  allowHeaders.add("Access-Control-Allow-Origin");
  allowHeaders.add("origin");
  allowHeaders.add("Content-Type");
  allowHeaders.add("accept");
  Set<HttpMethod> allowMethods = new HashSet<>();
  allowMethods.add(HttpMethod.GET);
  allowMethods.add(HttpMethod.POST);
  allowMethods.add(HttpMethod.DELETE);
  allowMethods.add(HttpMethod.PATCH);

  router.route().handler(CorsHandler.create("*") // <2>
    .allowedHeaders(allowHeaders)
    .allowedMethods(allowMethods));
  router.route().handler(BodyHandler.create()); // <3>

  // TODO:routes

  vertx.createHttpServer() // <4>
    .requestHandler(router::accept)
    .listen(PORT, HOST, result -> {
        if (result.succeeded())
          future.complete();
        else
          future.fail(result.cause());
      });
}
(⊙o⊙)…一长串代码诶。。是不是看着很晕呢?我们来详细解释一下。
首先我们创建了一个 Router 实例 (1)。这里的Router代表路由器,相信做过Web开发的开发者们一定不会陌生。路由器负责将对应的HTTP请求分发至对应的处理逻辑(Handler)中。每个Handler负责处理请求并且写入回应结果。当HTTP请求到达时,对应的Handler会被调用。
然后我们创建了两个Set:allowHeaders和allowMethods,并且我们向里面添加了一些HTTP Header以及HTTP Method,然后我们给路由器绑定了一个CorsHandler (2)。route()方法(无参数)代表此路由匹配所有请求。这两个Set的作用是支持 CORS,因为我们的API需要开启CORS以便配合前端正常工作。有关CORS的详细内容我们就不在这里细说了,详情可以参考这里。我们这里只需要知道如何开启CORS支持即可。
接下来我们给路由器绑定了一个全局的BodyHandler (3),它的作用是处理HTTP请求正文并获取其中的数据。比如,在实现添加待办事项逻辑的时候,我们需要读取请求正文中的JSON数据,这时候我们就可以用BodyHandler。
最后,我们通过vertx.createHttpServer()方法来创建一个HTTP服务端 (4)。注意这个功能是Vert.x Core提供的底层功能之一。然后我们将我们的路由处理器绑定到服务端上,这也是Vert.x Web的核心。你可能不熟悉router::accept这样的表示,这是Java 8中的 方法引用,它相当于一个分发路由的Handler。当有请求到达时,Vert.x会调用accept方法。然后我们通过listen方法监听8082端口。因为创建服务端的过程可能失败,因此我们还需要给listen方法传递一个Handler来检查服务端是否创建成功。正如我们前面所提到的,我们可以使用future.complete来表示过程成功,或者用future.fail来表示过程失败。
到现在为止,我们已经创建好HTTP服务端了,但我们还没有见到任何的路由呢!不要着急,是时候去声明路由了!
配置路由
下面我们来声明路由。正如我们之前提到的,我们的路由可以设计成这样:
- 添加待办事项:
POST /todos - 获取某一待办事项:
GET /todos/:todoId - 获取所有待办事项:
GET /todos - 更新待办事项:
PATCH /todos/:todoId - 删除某一待办事项:
DELETE /todos/:todoId - 删除所有待办事项:
DELETE /todos
路径参数
在URL中,我们可以通过
:name的形式定义路径参数。当处理请求的时候,Vert.x会自动获取这些路径参数并允许我们访问它们。拿我们的路由举个例子,/todos/19将todoId映射为19。
首先我们先在 io.vertx.blueprint.todolist 包下创建一个Constants类用于存储各种全局常量(当然也可以放到其对应的类中):
package io.vertx.blueprint.todolist;

public final class Constants {

  private Constants() {}

  /** API Route */
  public static final String API_GET = "/todos/:todoId";
  public static final String API_LIST_ALL = "/todos";
  public static final String API_CREATE = "/todos";
  public static final String API_UPDATE = "/todos/:todoId";
  public static final String API_DELETE = "/todos/:todoId";
  public static final String API_DELETE_ALL = "/todos";

}然后我们将start方法中的TODO标识处替换为以下的内容:
// routes
router.get(Constants.API_GET).handler(this::handleGetTodo);
router.get(Constants.API_LIST_ALL).handler(this::handleGetAll);
router.post(Constants.API_CREATE).handler(this::handleCreateTodo);
router.patch(Constants.API_UPDATE).handler(this::handleUpdateTodo);
router.delete(Constants.API_DELETE).handler(this::handleDeleteOne);
router.delete(Constants.API_DELETE_ALL).handler(this::handleDeleteAll);代码很直观、明了。我们用对应的方法(如get,post,patch等等)将路由路径与路由器绑定,并且我们调用handler方法给每个路由绑定上对应的Handler,接受的Handler类型为Handler<RoutingContext>。这里我们分别绑定了六个方法引用,它们的形式都类似于这样:
private void handleRequest(RoutingContext context) {
    // ...
}
我们将在稍后实现这六个方法,这也是我们待办事项服务逻辑的核心。
异步方法模式
我们之前提到过,Vert.x是 异步、非阻塞的 。每一个异步的方法总会接受一个 Handler 参数作为回调函数,当对应的操作完成时会调用接受的Handler,这是异步方法的一种实现。还有一种等价的实现是返回Future对象:
void doAsync(A a, B b, Handler<R> handler);
// 这两种实现等价
Future<R> doAsync(A a, B b);其中,Future 对象代表着一个操作的结果,这个操作可能还没有进行,可能正在进行,可能成功也可能失败。当操作完成时,Future对象会得到对应的结果。我们也可以通过setHandler方法给Future绑定一个Handler,当Future被赋予结果的时候,此Handler会被调用。
Future<R> future = doAsync(A a, B b);
future.setHandler(r -> {
    if (r.failed()) {
        // 处理失败
    } else {
        // 操作结果
    }
});
Vert.x中大多数异步方法都是基于Handler的。而在本教程中,这两种异步模式我们都会接触到。
待办事项逻辑实现
现在是时候来实现我们的待办事项业务逻辑了!这里我们使用 Redis 作为数据持久化存储。有关Redis的详细介绍请参照Redis 官方网站。Vert.x给我们提供了一个组件—— Vert.x-redis,允许我们以异步的形式操作Redis数据。
如何安装Redis?
请参照Redis官方网站上详细的安装指南。
Vert.x Redis
Vert.x Redis允许我们以异步的形式操作Redis数据。我们首先需要在build.gradle中添加以下依赖:
compile 'io.vertx:vertx-redis-client:3.4.1'我们通过RedisClient对象来操作Redis中的数据,因此我们定义了一个类成员redis。在使用RedisClient之前,我们首先需要与Redis建立连接,并且需要配置(以RedisOptions的形式),后边我们再讲需要配置哪些东西。
我们来实现 initData 方法用于初始化 RedisClient 并且测试连接:
private void initData() {
  RedisOptions config = new RedisOptions()
      .setHost(config().getString("redis.host", REDIS_HOST)) // redis host
      .setPort(config().getInteger("redis.port", REDIS_PORT)); // redis port

  this.redis = RedisClient.create(vertx, config); // create redis client

  redis.hset(Constants.REDIS_TODO_KEY, "24", Json.encodePrettily( // test connection
    new Todo(24, "Something to do...", false, 1, "todo/ex")), res -> {
    if (res.failed()) {
      LOGGER.error("Redis service is not running!");
      res.cause().printStackTrace();
    }
  });

}当我们在加载Verticle的时候,我们会首先调用initData方法,这样可以保证RedisClient可以被正常创建。
存储格式
我们知道,Redis支持各种格式的数据,并且支持多种方式存储(如list、hash map等)。这里我们将我们的待办事项存储在 哈希表(map) 中。我们使用待办事项的id作为key,JSON格式的待办事项数据作为value。同时,我们的哈希表本身也要有个key,我们把它命名为 VERT_TODO,并且存储到Constants类中:
public static final String REDIS_TODO_KEY = "VERT_TODO";正如我们之前提到的,我们利用了生成的JSON数据转换类来实现Todo实体与JSON数据之间的转换(通过几个构造函数),在后面实现待办事项服务的时候可以广泛利用。
获取/获取所有待办事项
我们首先来实现获取待办事项的逻辑。正如我们之前所提到的,我们的处理逻辑方法需要接受一个RoutingContext类型的参数。我们看一下获取某一待办事项的逻辑方法(handleGetTodo):
private void handleGetTodo(RoutingContext context) {
  String todoID = context.request().getParam("todoId"); // (1)
  if (todoID == null)
    sendError(400, context.response()); // (2)
  else {
    redis.hget(Constants.REDIS_TODO_KEY, todoID, x -> { // (3)
      if (x.succeeded()) {
        String result = x.result();
        if (result == null)
          sendError(404, context.response());
        else {
          context.response()
            .putHeader("content-type", "application/json")
            .end(result); // (4)
        }
      } else
        sendError(503, context.response());
    });
  }
}首先我们先通过getParam方法获取路径参数todoId (1)。我们需要检测路径参数获取是否成功,如果不成功就返回 400 Bad Request 错误 (2)。这里我们写一个函数封装返回错误response的逻辑:
private void sendError(int statusCode, HttpServerResponse response) {
  response.setStatusCode(statusCode).end();
}这里面,end方法是非常重要的。只有我们调用end方法时,对应的HTTP Response才能被发送回客户端。
再回到handleGetTodo方法中。如果我们成功获取到了todoId,我们可以通过hget操作从Redis中获取对应的待办事项 (3)。hget代表通过key从对应的哈希表中获取对应的value,我们来看一下hget函数的定义:
RedisClient hget(String key, String field, Handler<AsyncResult<String>> handler);第一个参数key对应哈希表的key,第二个参数field代表待办事项的key,第三个参数代表当获取操作成功时对应的回调。在Handler中,我们首先检查操作是否成功,如果不成功就返回503错误。如果成功了,我们就可以获取操作的结果了。结果是null的话,说明Redis中没有对应的待办事项,因此我们返回404 Not Found代表不存在。如果结果存在,那么我们就可以通过end方法将其写入response中 (4)。注意到我们所有的RESTful API都返回JSON格式的数据,所以我们将content-type头设为JSON。
获取所有待办事项的逻辑handleGetAll与handleGetTodo大体上类似,但实现上有些许不同:
private void handleGetAll(RoutingContext context) {
  redis.hvals(Constants.REDIS_TODO_KEY, res -> { // (1)
    if (res.succeeded()) {
      String encoded = Json.encodePrettily(res.result().stream() // (2)
        .map(x -> new Todo((String) x))
        .collect(Collectors.toList()));
      context.response()
        .putHeader("content-type", "application/json")
        .end(encoded); // (3)
    } else
      sendError(503, context.response());
  });
}这里我们通过hvals操作 (1) 来获取某个哈希表中的所有数据(以JSON数组的形式返回,即JsonArray对象)。在Handler中我们还是像之前那样先检查操作是否成功。如果成功的话我们就可以将结果写入response了。注意这里我们不能直接将返回的JsonArray写入response。想象一下返回的JsonArray包括着待办事项的key以及对应的JSON数据(字符串形式),因此此时每个待办事项对应的JSON数据都被转义了,所以我们需要先把这些转义过的JSON数据转换成实体对象,再重新编码。
我们这里采用了一种响应式编程思想的方法。首先我们了解到JsonArray类继承了Iterable<Object>接口(是不是感觉它很像List呢?),因此我们可以通过stream方法将其转化为Stream对象。注意这里的Stream可不是传统意义上讲的输入输出流(I/O stream),而是数据流(data flow)。我们需要对数据流进行一系列的变换处理操作,这就是响应式编程的思想(也有点函数式编程的思想)。我们将数据流中的每个字符串数据转换为Todo实体对象,这个过程是通过map算子实现的。我们这里就不深入讨论map算子了,但它在函数式编程中非常重要。在map过后,我们通过collect方法将数据流“归约”成List<Todo>。现在我们就可以通过Json.encodePrettily方法对得到的list进行编码了,转换成JSON格式的数据。最后我们将转换后的结果写入到response中 (3)。
创建待办事项
经过了上面两个业务逻辑实现的过程,你应该开始熟悉Vert.x了~现在我们来实现创建待办事项的逻辑:
private void handleCreateTodo(RoutingContext context) {
  try {
    final Todo todo = wrapObject(new Todo(context.getBodyAsString()), context);
    final String encoded = Json.encodePrettily(todo);
    redis.hset(Constants.REDIS_TODO_KEY, String.valueOf(todo.getId()),
      encoded, res -> {
        if (res.succeeded())
          context.response()
            .setStatusCode(201)
            .putHeader("content-type", "application/json")
            .end(encoded);
        else
          sendError(503, context.response());
      });
  } catch (DecodeException e) {
    sendError(400, context.response());
  }
}首先我们通过context.getBodyAsString()方法来从请求正文中获取JSON数据并转换成Todo实体对象 (1)。这里我们包装了一个处理Todo实例的方法,用于给其添加必要的信息(如URL):
private Todo wrapObject(Todo todo, RoutingContext context) {
  int id = todo.getId();
  if (id > Todo.getIncId()) {
    Todo.setIncIdWith(id);
  } else if (id == 0)
    todo.setIncId();
  todo.setUrl(context.request().absoluteURI() + "/" + todo.getId());
  return todo;
}对于没有ID(或者为默认ID)的待办事项,我们会给它分配一个ID。这里我们采用了自增ID的策略,通过AtomicInteger来实现。
然后我们通过Json.encodePrettily方法将我们的Todo实例再次编码成JSON格式的数据 (2)。接下来我们利用hset函数将待办事项实例插入到对应的哈希表中 (3)。如果插入成功,返回 201 状态码 (4)。
| 201 状态码? 正如你所看到的那样,我们将状态码设为 201,这代表CREATED(已创建)。另外,如果不指定状态码的话,Vert.x Web默认将状态码设为 200 OK。 |
同时,我们接收到的HTTP请求首部可能格式不正确,因此我们需要在方法中捕获DecodeException异常。这样一旦捕获到DecodeException异常,我们就返回400 Bad Request状态码。
更新待办事项
如果你想改变你的计划,你就需要更新你的待办事项。我们来实现更新待办事项的逻辑,它有点小复杂(或者说是,繁琐?):
// PATCH /todos/:todoId
private void handleUpdateTodo(RoutingContext context) {
  try {
    String todoID = context.request().getParam("todoId"); // (1)
    final Todo newTodo = new Todo(context.getBodyAsString()); // (2)
    // handle error
    if (todoID == null || newTodo == null) {
      sendError(400, context.response());
      return;
    }

    redis.hget(Constants.REDIS_TODO_KEY, todoID, x -> { // (3)
      if (x.succeeded()) {
        String result = x.result();
        if (result == null)
          sendError(404, context.response()); // (4)
        else {
          Todo oldTodo = new Todo(result);
          String response = Json.encodePrettily(oldTodo.merge(newTodo)); // (5)
          redis.hset(Constants.REDIS_TODO_KEY, todoID, response, res -> { // (6)
            if (res.succeeded()) {
              context.response()
                .putHeader("content-type", "application/json")
                .end(response); // (7)
            }
          });
        }
      } else
        sendError(503, context.response());
    });
  } catch (DecodeException e) {
    sendError(400, context.response());
  }
}
唔。。。一大长串代码诶。。。我们来看一下。首先我们从 RoutingContext 中获取路径参数 todoId (1),这是我们想要更改待办事项对应的id。然后我们从请求正文中获取新的待办事项数据 (2)。这一步也有可能抛出 DecodeException 异常因此我们也需要去捕获它。要更新待办事项,我们需要先通过hget函数获取之前的待办事项 (3),检查其是否存在。获取旧的待办事项之后,我们调用之前在Todo类中实现的merge方法将旧待办事项与新待办事项整合到一起 (5),然后编码成JSON格式的数据。然后我们通过hset函数更新对应的待办事项 (6)(hset表示如果不存在就插入,存在就更新)。操作成功的话,返回 200 OK 状态。
这就是更新待办事项的逻辑~要有耐心哟,我们马上就要见到胜利的曙光了~下面我们来实现删除待办事项的逻辑。
删除/删除全部待办事项
删除待办事项的逻辑非常简单。我们利用hdel函数来删除某一待办事项,用del函数删掉所有待办事项(实际上是直接把那个哈希表给删了)。如果删除操作成功,返回204 No Content 状态。
这里直接给出代码:
private void handleDeleteOne(RoutingContext context) {
  String todoID = context.request().getParam("todoId");
  redis.hdel(Constants.REDIS_TODO_KEY, todoID, res -> {
    if (res.succeeded())
      context.response().setStatusCode(204).end();
    else
      sendError(503, context.response());
  });
}

private void handleDeleteAll(RoutingContext context) {
  redis.del(Constants.REDIS_TODO_KEY, res -> {
    if (res.succeeded())
      context.response().setStatusCode(204).end();
    else
      sendError(503, context.response());
  });
}啊哈!我们实现待办事项服务的Verticle已经完成咯~一颗赛艇!但是我们该如何去运行我们的Verticle呢?答案是,我们需要 部署并运行 我们的Verticle。还好Vert.x提供了一个运行Verticle的辅助工具:Vert.x Launcher,让我们来看看如何利用它。
将应用与Vert.x Launcher一起打包
要通过Vert.x Launcher来运行Verticle,我们需要在build.gradle中配置一下:
jar {
  // by default fat jar
  archiveName = 'vertx-blueprint-todo-backend-fat.jar'
  from { configurations.compile.collect { it.isDirectory() ? it : zipTree(it) } }
  manifest {
      attributes 'Main-Class': 'io.vertx.core.Launcher'
      attributes 'Main-Verticle': 'io.vertx.blueprint.todolist.verticles.SingleApplicationVerticle'
  }
}- 在
jar区块中,我们配置Gradle使其生成 fat-jar,并指定启动类。fat-jar 是一个给Vert.x应用打包的简便方法,它直接将我们的应用连同所有的依赖都给打包到jar包中去了,这样我们可以直接通过jar包运行我们的应用而不必再指定依赖的CLASSPATH - 我们将
Main-Class属性设为io.vertx.core.Launcher,这样就可以通过Vert.x Launcher来启动对应的Verticle了。另外我们需要将Main-Verticle属性设为我们想要部署的Verticle的类名(全名)。
配置好了以后,我们就可以打包了:
gradle build运行我们的服务
万事俱备,只欠东风。是时候运行我们的待办事项服务了!首先我们先启动Redis服务:
redis-server然后运行服务:
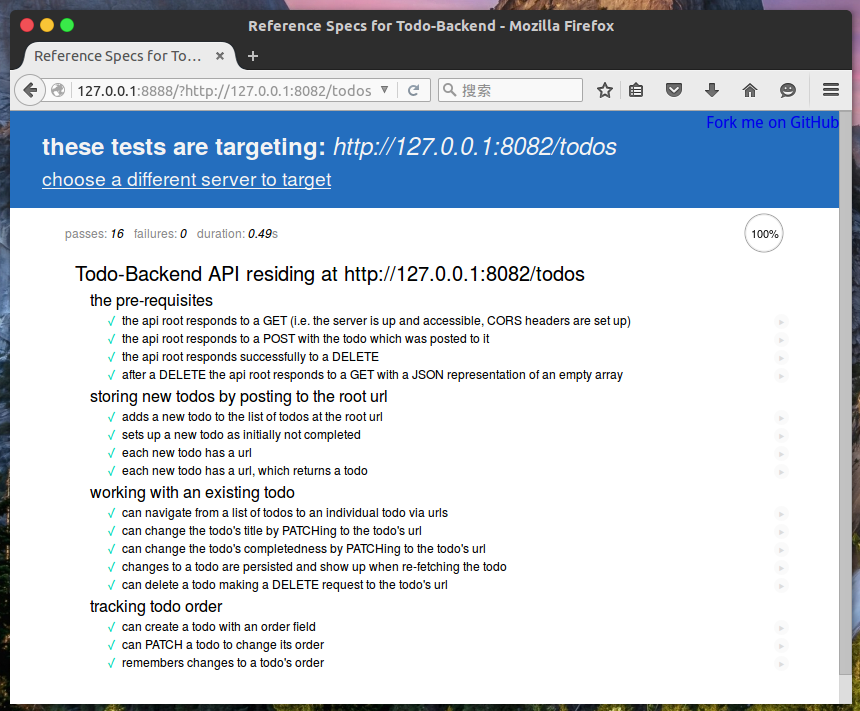
java -jar build/libs/vertx-blueprint-todo-backend-fat.jar如果没问题的话,你将会在终端中看到 Succeeded in deploying verticle 的字样。下面我们可以自由测试我们的API了,其中最简便的方法是借助 todo-backend-js-spec 来测试。
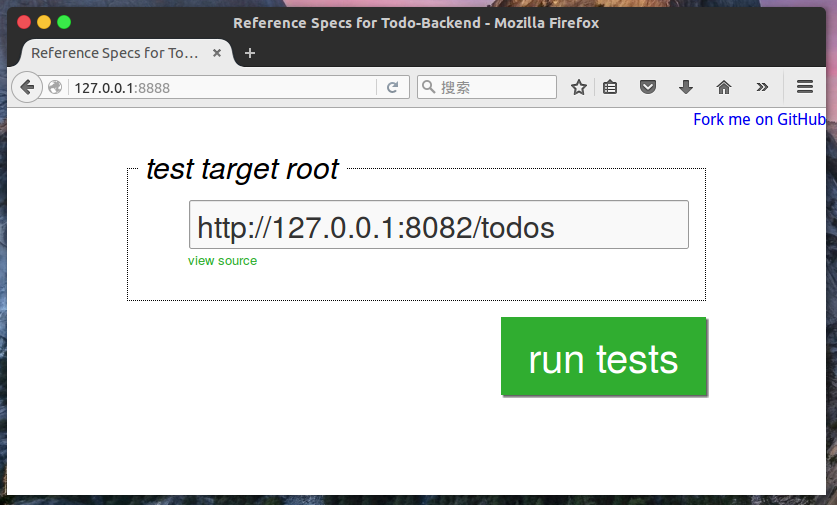
键入 http://127.0.0.1:8082/todos:
测试结果:
当然,我们也可以用其它工具,比如 curl :
sczyh30@sczyh30-workshop:~$ curl http://127.0.0.1:8082/todos
[ {
  "id" : 20578623,
  "title" : "blah",
  "completed" : false,
  "order" : 95,
  "url" : "http://127.0.0.1:8082/todos/20578623"
}, {
  "id" : 1744802607,
  "title" : "blah",
  "completed" : false,
  "order" : 523,
  "url" : "http://127.0.0.1:8082/todos/1744802607"
}, {
  "id" : 981337975,
  "title" : "blah",
  "completed" : false,
  "order" : 95,
  "url" : "http://127.0.0.1:8082/todos/981337975"
} ]
将服务与控制器分离
啊哈~我们的待办事项服务已经可以正常运行了,但是回头再来看看 SingleApplicationVerticle 类的代码,你会发现它非常混乱,待办事项业务逻辑与控制器混杂在一起,让这个类非常的庞大,并且这也不利于我们服务的扩展。根据面向对象解耦的思想,我们需要将控制器部分与业务逻辑部分分离。
用Future实现异步服务
下面我们来设计我们的业务逻辑层。就像我们之前提到的那样,我们的服务需要是异步的,因此这些服务的方法要么需要接受一个Handler参数作为回调,要么需要返回一个Future对象。但是想象一下很多个Handler混杂在一起嵌套的情况,你会陷入 回调地狱,这是非常糟糕的。因此,这里我们用Future实现我们的待办事项服务。
在 io.vertx.blueprint.todolist.service 包下创建 TodoService 接口并且编写以下代码:
package io.vertx.blueprint.todolist.service;

import io.vertx.blueprint.todolist.entity.Todo;
import io.vertx.core.Future;

import java.util.List;
import java.util.Optional;


public interface TodoService {

  Future<Boolean> initData(); // 初始化数据(或数据库)

  Future<Boolean> insert(Todo todo);

  Future<List<Todo>> getAll();

  Future<Optional<Todo>> getCertain(String todoID);

  Future<Todo> update(String todoId, Todo newTodo);

  Future<Boolean> delete(String todoId);

  Future<Boolean> deleteAll();

}注意到getCertain方法返回一个Future<Optional<Todo>>对象。那么Optional是啥呢?它封装了一个可能为空的对象。因为数据库里面可能没有与我们给定的todoId相对应的待办事项,查询的结果可能为空,因此我们给它包装上 Optional。Optional 可以避免万恶的 NullPointerException,并且它在函数式编程中用途特别广泛(在Haskell中对应 Maybe Monad)。
既然我们已经设计好我们的异步服务接口了,让我们来重构原先的Verticle吧!
开始重构!
我们创建一个新的Verticle。在 io.vertx.blueprint.todolist.verticles 包中创建 TodoVerticle 类,并编写以下代码:
package io.vertx.blueprint.todolist.verticles;

import io.vertx.blueprint.todolist.Constants;
import io.vertx.blueprint.todolist.entity.Todo;
import io.vertx.blueprint.todolist.service.TodoService;

import io.vertx.core.AbstractVerticle;
import io.vertx.core.AsyncResult;
import io.vertx.core.Future;
import io.vertx.core.Handler;
import io.vertx.core.http.HttpMethod;
import io.vertx.core.http.HttpServerResponse;
import io.vertx.core.json.DecodeException;
import io.vertx.core.json.Json;
import io.vertx.ext.web.Router;
import io.vertx.ext.web.RoutingContext;
import io.vertx.ext.web.handler.BodyHandler;
import io.vertx.ext.web.handler.CorsHandler;

import java.util.HashSet;
import java.util.Random;
import java.util.Set;
import java.util.function.Consumer;

public class TodoVerticle extends AbstractVerticle {

  private static final String HOST = "0.0.0.0";
  private static final int PORT = 8082;

  private TodoService service;

  private void initData() {
    // TODO
  }

  @Override
  public void start(Future<Void> future) throws Exception {
    Router router = Router.router(vertx);
    // CORS support
    Set<String> allowHeaders = new HashSet<>();
    allowHeaders.add("x-requested-with");
    allowHeaders.add("Access-Control-Allow-Origin");
    allowHeaders.add("origin");
    allowHeaders.add("Content-Type");
    allowHeaders.add("accept");
    Set<HttpMethod> allowMethods = new HashSet<>();
    allowMethods.add(HttpMethod.GET);
    allowMethods.add(HttpMethod.POST);
    allowMethods.add(HttpMethod.DELETE);
    allowMethods.add(HttpMethod.PATCH);

    router.route().handler(BodyHandler.create());
    router.route().handler(CorsHandler.create("*")
      .allowedHeaders(allowHeaders)
      .allowedMethods(allowMethods));

    // routes
    router.get(Constants.API_GET).handler(this::handleGetTodo);
    router.get(Constants.API_LIST_ALL).handler(this::handleGetAll);
    router.post(Constants.API_CREATE).handler(this::handleCreateTodo);
    router.patch(Constants.API_UPDATE).handler(this::handleUpdateTodo);
    router.delete(Constants.API_DELETE).handler(this::handleDeleteOne);
    router.delete(Constants.API_DELETE_ALL).handler(this::handleDeleteAll);

    vertx.createHttpServer()
      .requestHandler(router::accept)
      .listen(PORT, HOST, result -> {
          if (result.succeeded())
            future.complete();
          else
            future.fail(result.cause());
        });

    initData();
  }

  private void handleCreateTodo(RoutingContext context) {
    // TODO
  }

  private void handleGetTodo(RoutingContext context) {
    // TODO
  }

  private void handleGetAll(RoutingContext context) {
    // TODO
  }

  private void handleUpdateTodo(RoutingContext context) {
    // TODO
  }

  private void handleDeleteOne(RoutingContext context) {
    // TODO
  }

  private void handleDeleteAll(RoutingContext context) {
     // TODO
  }

  private void sendError(int statusCode, HttpServerResponse response) {
    response.setStatusCode(statusCode).end();
  }

  private void badRequest(RoutingContext context) {
    context.response().setStatusCode(400).end();
  }

  private void notFound(RoutingContext context) {
    context.response().setStatusCode(404).end();
  }

  private void serviceUnavailable(RoutingContext context) {
    context.response().setStatusCode(503).end();
  }

  private Todo wrapObject(Todo todo, RoutingContext context) {
    int id = todo.getId();
    if (id > Todo.getIncId()) {
      Todo.setIncIdWith(id);
    } else if (id == 0)
      todo.setIncId();
    todo.setUrl(context.request().absoluteURI() + "/" + todo.getId());
    return todo;
  }
}很熟悉吧?这个Verticle的结构与我们之前的Verticle相类似,这里就不多说了。下面我们来利用我们之前编写的服务接口实现每一个控制器方法。
首先先实现 initData 方法,此方法用于初始化存储结构:
private void initData() {
  final String serviceType = config().getString("service.type", "redis");
  LOGGER.info("Service Type: " + serviceType);
  switch (serviceType) {
    case "jdbc":
      service = new JdbcTodoService(vertx, config());
      break;
    case "redis":
    default:
      RedisOptions config = new RedisOptions()
        .setHost(config().getString("redis.host", "127.0.0.1"))
        .setPort(config().getInteger("redis.port", 6379));
      service = new RedisTodoService(vertx, config);
  }

  service.initData().setHandler(res -> {
      if (res.failed()) {
        LOGGER.error("Persistence service is not running!");
        res.cause().printStackTrace();
      }
    });
}首先我们从配置中获取服务的类型,这里我们有两种类型的服务:redis和jdbc,默认是redis。接着我们会根据服务的类型以及对应的配置来创建服务。在这里,我们的配置都是从JSON格式的配置文件中读取,并通过Vert.x Launcher的-conf项加载。后面我们再讲要配置哪些东西。
接着我们给service.initData()方法返回的Future对象绑定了一个Handler,这个Handler将会在Future得到结果的时候被调用。一旦初始化过程失败,错误信息将会显示到终端上。
其它的方法实现也类似,这里就不详细解释了,直接放上代码,非常简洁明了:
/**
 * Wrap the result handler with failure handler (503 Service Unavailable)
 */
private <T> Handler<AsyncResult<T>> resultHandler(RoutingContext context, Consumer<T> consumer) {
  return res -> {
    if (res.succeeded()) {
      consumer.accept(res.result());
    } else {
      serviceUnavailable(context);
    }
  };
}

private void handleCreateTodo(RoutingContext context) {
  try {
    final Todo todo = wrapObject(new Todo(context.getBodyAsString()), context);
    final String encoded = Json.encodePrettily(todo);

    service.insert(todo).setHandler(resultHandler(context, res -> {
      if (res) {
        context.response()
          .setStatusCode(201)
          .putHeader("content-type", "application/json")
          .end(encoded);
      } else {
        serviceUnavailable(context);
      }
    }));
  } catch (DecodeException e) {
    sendError(400, context.response());
  }
}

private void handleGetTodo(RoutingContext context) {
  String todoID = context.request().getParam("todoId");
  if (todoID == null) {
    sendError(400, context.response());
    return;
  }

  service.getCertain(todoID).setHandler(resultHandler(context, res -> {
    if (!res.isPresent())
      notFound(context);
    else {
      final String encoded = Json.encodePrettily(res.get());
      context.response()
        .putHeader("content-type", "application/json")
        .end(encoded);
    }
  }));
}

private void handleGetAll(RoutingContext context) {
  service.getAll().setHandler(resultHandler(context, res -> {
    if (res == null) {
      serviceUnavailable(context);
    } else {
      final String encoded = Json.encodePrettily(res);
      context.response()
        .putHeader("content-type", "application/json")
        .end(encoded);
    }
  }));
}

private void handleUpdateTodo(RoutingContext context) {
  try {
    String todoID = context.request().getParam("todoId");
    final Todo newTodo = new Todo(context.getBodyAsString());
    // handle error
    if (todoID == null) {
      sendError(400, context.response());
      return;
    }
    service.update(todoID, newTodo)
      .setHandler(resultHandler(context, res -> {
        if (res == null)
          notFound(context);
        else {
          final String encoded = Json.encodePrettily(res);
          context.response()
            .putHeader("content-type", "application/json")
            .end(encoded);
        }
      }));
  } catch (DecodeException e) {
    badRequest(context);
  }
}

private Handler<AsyncResult<Boolean>> deleteResultHandler(RoutingContext context) {
  return res -> {
    if (res.succeeded()) {
      if (res.result()) {
        context.response().setStatusCode(204).end();
      } else {
        serviceUnavailable(context);
      }
    } else {
      serviceUnavailable(context);
    }
  };
}

private void handleDeleteOne(RoutingContext context) {
  String todoID = context.request().getParam("todoId");
  service.delete(todoID)
    .setHandler(deleteResultHandler(context));
}

private void handleDeleteAll(RoutingContext context) {
  service.deleteAll()
    .setHandler(deleteResultHandler(context));
}是不是和之前的Verticle很相似呢?这里我们还封装了两个Handler生成器:resultHandler 和 deleteResultHandler。这两个生成器封装了一些重复的代码,可以减少代码量。
嗯。。。我们的新Verticle写好了,那么是时候去实现具体的业务逻辑了。这里我们会实现两个版本的业务逻辑,分别对应两种存储:Redis 和 MySQL。
Vert.x-Redis版本的待办事项服务
之前我们已经实现过一遍Redis版本的服务了,因此你应该对其非常熟悉了。这里我们仅仅解释一个 update 方法,其它的实现都非常类似,代码可以在GitHub上浏览。
Monadic Future
回想一下我们之前写的更新待办事项的逻辑,我们会发现它其实是由两个独立的操作组成 - get 和 insert(对于Redis来说)。所以呢,我们可不可以复用 getCertain 和 insert 这两个方法?当然了!因为Future是可组合的,因此我们可以将这两个方法返回的Future组合到一起。是不是非常方便呢?我们来编写此方法:
@Override
public Future<Todo> update(String todoId, Todo newTodo) {
  return this.getCertain(todoId).compose(old -> { // (1)
    if (old.isPresent()) {
      Todo fnTodo = old.get().merge(newTodo);
      return this.insert(fnTodo)
        .map(r -> r ? fnTodo : null); // (2)
    } else {
      return Future.succeededFuture(); // (3)
    }
  });
}首先我们调用了getCertain方法,此方法返回一个Future<Optional<Todo>>对象。同时我们使用compose函数将此方法返回的Future与另一个Future进行组合(1),其中compose函数接受一个T => Future<U>类型的lambda。然后我们接着检查旧的待办事项是否存在,如果存在的话,我们将新的待办事项与旧的待办事项相融合,然后更新待办事项。注意到insert方法返回Future<Boolean>类型的Future,因此我们还需要对此Future的结果做变换,这个变换的过程是通过map函数实现的(2)。map函数接受一个T => U类型的lambda。如果旧的待办事项不存在,我们返回一个包含null的Future(3)。最后我们返回组合后的Future对象。
Future的本质
在函数式编程中,
Future实际上是一种Monad。有关Monad的理论较为复杂,这里就不进行阐述了。你可以简单地把它看作是一个可以进行变换(map)和组合(compose)的包装对象。我们把这种特性叫做 monadic。
下面来实现MySQL版本的待办事项服务。
Vert.x-JDBC版本的待办事项服务
JDBC ++ 异步
我们使用Vert.x-JDBC和MySQL来实现JDBC版本的待办事项服务。我们知道,数据库操作都是阻塞操作,很可能会占用不少时间。而Vert.x-JDBC提供了一种异步操作数据库的模式,很神奇吧?所以,在传统JDBC代码下我们要执行SQL语句需要这样:
String SQL = "SELECT * FROM todo";
// ...
ResultSet rs = pstmt.executeQuery(SQL);
而在Vert.x JDBC中,我们可以利用回调获取数据:
connection.query(SQL, result -> {
    // do something with result...
});
这种异步操作可以有效避免对数据的等待。当数据获取成功时会自动调用回调函数来执行处理数据的逻辑。
添加依赖
首先我们需要向build.gradle文件中添加依赖:
compile 'io.vertx:vertx-jdbc-client:3.4.1'
compile 'mysql:mysql-connector-java:6.0.5'
其中第二个依赖是MySQL的驱动,如果你想使用其他的数据库,你需要自行替换掉这个依赖。
初始化JDBCClient
在Vert.x JDBC中,我们需要从一个JDBCClient对象中获取数据库连接,因此我们来看一下如何创建JDBCClient实例。在io.vertx.blueprint.todolist.service包下创建JdbcTodoService类:
package io.vertx.blueprint.todolist.service;

import io.vertx.blueprint.todolist.entity.Todo;

import io.vertx.core.Future;
import io.vertx.core.Vertx;
import io.vertx.core.json.JsonArray;
import io.vertx.core.json.JsonObject;
import io.vertx.ext.jdbc.JDBCClient;
import io.vertx.ext.sql.SQLConnection;

import java.util.List;
import java.util.Optional;
import java.util.stream.Collectors;


public class JdbcTodoService implements TodoService {

  private final Vertx vertx;
  private final JsonObject config;
  private final JDBCClient client;

  public JdbcTodoService(JsonObject config) {
    this(Vertx.vertx(), config);
  }

  public JdbcTodoService(Vertx vertx, JsonObject config) {
    this.vertx = vertx;
    this.config = config;
    this.client = JDBCClient.createShared(vertx, config);
  }

  // ...
}我们使用JDBCClient.createShared(vertx, config)方法来创建一个JDBCClient实例,其中我们传入一个JsonObject对象作为配置。一般来说,我们需要配置以下的内容:
- url - JDBC URL,比如
jdbc:mysql://localhost/vertx_blueprint - driver_class - JDBC驱动名称,比如
com.mysql.cj.jdbc.Driver - user - 数据库用户
- password - 数据库密码
我们将会通过Vert.x Launcher从配置文件中读取此JsonObject。
现在我们已经创建了JDBCClient实例了,下面我们需要在MySQL中建这样一个表:
CREATE TABLE `todo` (
  `id` INT(11) NOT NULL AUTO_INCREMENT,
  `title` VARCHAR(255) DEFAULT NULL,
  `completed` TINYINT(1) DEFAULT NULL,
  `order` INT(11) DEFAULT NULL,
  `url` VARCHAR(255) DEFAULT NULL,
  PRIMARY KEY (`id`)
)
我们把要用到的数据库语句都存到服务类中(这里我们就不讨论如何设计表以及写SQL了):
private static final String SQL_CREATE = "CREATE TABLE IF NOT EXISTS `todo` (\n" +
  "  `id` int(11) NOT NULL AUTO_INCREMENT,\n" +
  "  `title` varchar(255) DEFAULT NULL,\n" +
  "  `completed` tinyint(1) DEFAULT NULL,\n" +
  "  `order` int(11) DEFAULT NULL,\n" +
  "  `url` varchar(255) DEFAULT NULL,\n" +
  "  PRIMARY KEY (`id`) )";
private static final String SQL_INSERT = "INSERT INTO `todo` " +
  "(`id`, `title`, `completed`, `order`, `url`) VALUES (?, ?, ?, ?, ?)";
private static final String SQL_QUERY = "SELECT * FROM todo WHERE id = ?";
private static final String SQL_QUERY_ALL = "SELECT * FROM todo";
private static final String SQL_UPDATE = "UPDATE `todo`\n" +
  "SET `id` = ?,\n" +
  "`title` = ?,\n" +
  "`completed` = ?,\n" +
  "`order` = ?,\n" +
  "`url` = ?\n" +
  "WHERE `id` = ?;";
private static final String SQL_DELETE = "DELETE FROM `todo` WHERE `id` = ?";
private static final String SQL_DELETE_ALL = "DELETE FROM `todo`";
OK!一切工作准备就绪,下面我们来实现我们的JDBC版本的服务~
实现JDBC版本的服务
所有的获取连接、获取执行数据的操作都要在Handler中完成。比如我们可以这样获取数据库连接:
client.getConnection(conn -> {
      if (conn.succeeded()) {
        final SQLConnection connection = conn.result();
        // do something...
      } else {
        // handle failure
      }
});由于每一个数据库操作都需要获取数据库连接,因此我们来包装一个返回Handler<AsyncResult<SQLConnection>>的方法,在此回调中可以直接使用数据库连接,可以减少一些代码量:
private Handler<AsyncResult<SQLConnection>> connHandler(Future future, Handler<SQLConnection> handler) {
  return conn -> {
    if (conn.succeeded()) {
      final SQLConnection connection = conn.result();
      handler.handle(connection);
    } else {
      future.fail(conn.cause());
    }
  };
}
获取数据库连接以后,我们就可以对数据库进行各种操作了:
query: 执行查询(raw SQL)queryWithParams: 执行预编译查询(prepared statement)updateWithParams: 执行预编译DDL语句(prepared statement)execute: 执行任意SQL语句
所有的方法都是异步的所以每个方法最后都接受一个Handler参数,我们可以在此Handler中获取结果并执行相应逻辑。
现在我们来编写初始化数据库表的initData方法:
@Override
public Future<Boolean> initData() {
  Future<Boolean> result = Future.future();
  client.getConnection(connHandler(result, connection ->
    connection.execute(SQL_CREATE, create -> {
      if (create.succeeded()) {
        result.complete(true);
      } else {
        result.fail(create.cause());
      }
      connection.close();
    })));
  return result;
}此方法仅会在Verticle初始化时被调用,如果todo表不存在的话就创建一下。注意,最后一定要关闭数据库连接。
下面我们来实现插入逻辑方法:
@Override
public Future<Boolean> insert(Todo todo) {
  Future<Boolean> result = Future.future();
  client.getConnection(connHandler(result, connection -> {
    connection.updateWithParams(SQL_INSERT, new JsonArray().add(todo.getId())
      .add(todo.getTitle())
      .add(todo.isCompleted())
      .add(todo.getOrder())
      .add(todo.getUrl()), r -> {
      if (r.failed()) {
        result.fail(r.cause());
      } else {
        result.complete(true);
      }
      connection.close();
    });
  }));
  return result;
}我们使用updateWithParams方法执行插入逻辑,并且传递了一个JsonArray变量作为预编译参数。这一点很重要,使用预编译语句可以有效防止SQL注入。
我们再来实现getCertain方法:
@Override
public Future<Optional<Todo>> getCertain(String todoID) {
  Future<Optional<Todo>> result = Future.future();
  client.getConnection(connHandler(result, connection -> {
    connection.queryWithParams(SQL_QUERY, new JsonArray().add(todoID), r -> {
      if (r.failed()) {
        result.fail(r.cause());
      } else {
        List<JsonObject> list = r.result().getRows();
        if (list == null || list.isEmpty()) {
          result.complete(Optional.empty());
        } else {
          result.complete(Optional.of(new Todo(list.get(0))));
        }
      }
      connection.close();
    });
  }));
  return result;
}在这个方法里,当我们的查询语句执行以后,我们获得到了ResultSet实例作为查询的结果集。我们可以通过getColumnNames方法获取字段名称,通过getResults方法获取结果。这里我们通过getRows方法来获取结果集,结果集的类型为List<JsonObject>。
其余的几个方法:getAll, update, delete 以及 deleteAll都遵循上面的模式,这里就不多说了。你可以在GitHub上浏览完整的源代码。
重构完毕,我们来写待办事项服务对应的配置,然后再来运行!
再来运行!
首先我们在项目的根目录下创建一个 config 文件夹作为配置文件夹。我们在其中创建一个config_jdbc.json文件作为 jdbc 类型服务的配置:
{
  "service.type": "jdbc",
  "url": "jdbc:mysql://localhost/vertx_blueprint?characterEncoding=UTF-8&useSSL=false",
  "driver_class": "com.mysql.cj.jdbc.Driver",
  "user": "vbpdb1",
  "password": "666666*",
  "max_pool_size": 30
}
你需要根据自己的情况替换掉上述配置文件中相应的内容(如 JDBC URL,JDBC 驱动 等)。
再建一个config.json文件作为redis类型服务的配置(其它的项就用默认配置好啦):
{
  "service.type": "redis"
}我们的构建文件也需要更新咯~这里直接给出最终的build.gradle文件:
plugins {
  id 'java'
}

version '3.4.1'

ext {
  vertxVersion = "3.4.1"
}

jar {
  // by default fat jar
  archiveName = 'vertx-blueprint-todo-backend-fat.jar'
  from { configurations.compile.collect { it.isDirectory() ? it : zipTree(it) } }
  manifest {
    attributes 'Main-Class': 'io.vertx.core.Launcher'
    attributes 'Main-Verticle': 'io.vertx.blueprint.todolist.verticles.TodoVerticle'
  }
}

repositories {
  jcenter()
}

// compileOnly requires Gradle 2.12+
task annotationProcessing(type: JavaCompile, group: 'build') {
  source = sourceSets.main.java
  classpath = configurations.compile + configurations.compileOnly
  destinationDir = project.file('src/main/generated')
  options.compilerArgs = [
    "-proc:only",
    "-processor", "io.vertx.codegen.CodeGenProcessor",
    "-Acodegen.output=${destinationDir.absolutePath}"
  ]
}

sourceSets {
  main {
    java {
      srcDirs += 'src/main/generated'
    }
  }
}

compileJava {
  targetCompatibility = 1.8
  sourceCompatibility = 1.8

  dependsOn annotationProcessing
}

dependencies {
  compile("io.vertx:vertx-core:${vertxVersion}")
  compile("io.vertx:vertx-web:${vertxVersion}")
  compile("io.vertx:vertx-jdbc-client:${vertxVersion}")
  compile("io.vertx:vertx-redis-client:${vertxVersion}")
  compileOnly("io.vertx:vertx-codegen:${vertxVersion}")
  compile 'mysql:mysql-connector-java:6.0.5'

  testCompile("io.vertx:vertx-unit:${vertxVersion}")
  testCompile group: 'junit', name: 'junit', version: '4.12'
}


task wrapper(type: Wrapper) {
  gradleVersion = '3.4'
}
好啦好啦,迫不及待了吧?~打开终端,构建我们的应用:
gradle build然后我们可以运行Redis版本的待办事项服务:
java -jar build/libs/vertx-blueprint-todo-backend-fat.jar -conf config/config.json我们也可以运行JDBC版本的待办事项服务:
java -jar build/libs/vertx-blueprint-todo-backend-fat.jar -conf config/config_jdbc.json同样地,我们也可以使用todo-backend-js-spec来测试我们的API。由于我们的API设计没有改变,因此测试结果应该不会有变化。
我们也提供了待办事项服务对应的Docker Compose镜像构建文件,可以直接通过Docker来运行我们的待办事项服务。你可以在仓库的根目录下看到相应的配置文件,并通过 docker-compose up -- build 命令来构建并运行。
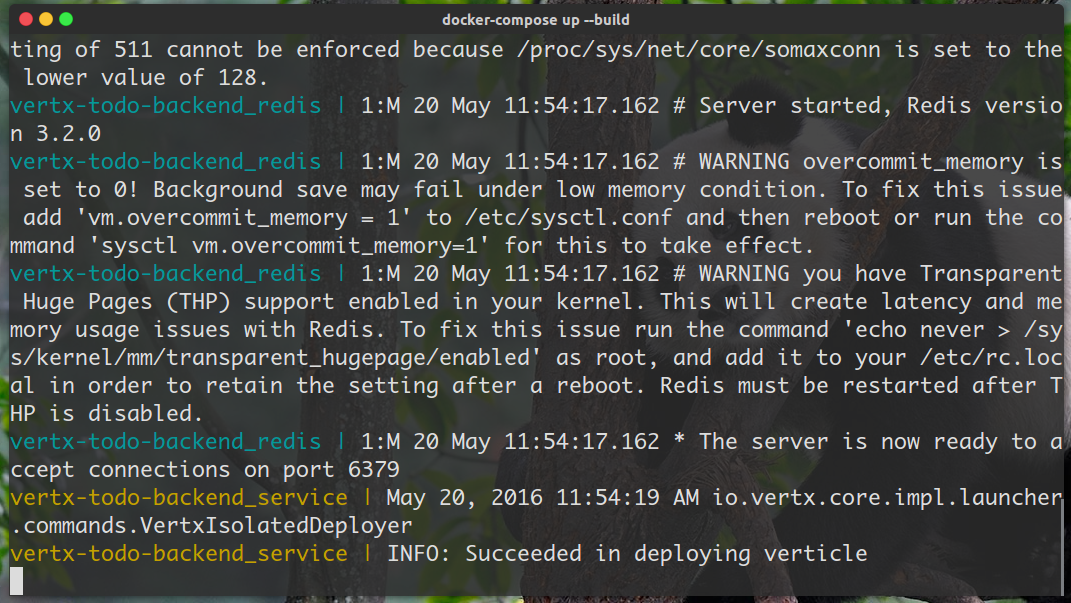
哈哈,成功了!
哈哈,恭喜你完成了整个待办事项服务,是不是很开心?~在整个教程中,你应该学到了很多关于 Vert.x Web、 Vert.x Redis 和 Vert.x JDBC 的开发知识。当然,最重要的是,你会对Vert.x的 异步开发模式 有了更深的理解和领悟。
另外,Vert.x 蓝图系列已经发布至Vert.x官网:Vert.x Blueprint Tutorials。其中第二个Blueprint是关于消息应用的,第三个Blueprint是关于微服务的,有兴趣的朋友可以参考后面几篇蓝图教程。
更多关于Vert.x的文章,请参考Blog on Vert.x Website。官网的资料是最全面的 :-)
来自其它框架?
之前你可能用过其它的框架,比如Spring Boot。这一小节,我将会用类比的方式来介绍Vert.x Web的使用。
来自Spring Boot/Spring MVC
在Spring Boot中,我们通常在控制器(Controller)中来配置路由以及处理请求,比如:
@RestController
@ComponentScan
@EnableAutoConfiguration
public class TodoController {

  @Autowired
  private TodoService service;

  @RequestMapping(method = RequestMethod.GET, value = "/todos/{id}")
  public Todo getCertain(@PathVariable("id") int id) {
    return service.fetch(id);
  }
}
在Spring Boot中,我们使用 @RequestMapping 注解来配置路由,而在Vert.x Web中,我们是通过 Router 对象来配置路由的。并且因为Vert.x Web是异步的,我们会给每个路由绑定一个处理器(Handler)来处理对应的请求。
另外,在Vert.x Web中,我们使用 end 方法来向客户端发送HTTP response。相对地,在Spring Boot中我们直接在每个方法中返回结果作为response。
来自Play Framework 2
如果之前用过Play Framework 2的话,你一定会非常熟悉异步开发模式。在Play Framework 2中,我们在 routes 文件中定义路由,类似于这样:
GET /todos/:todoId controllers.TodoController.handleGetCertain(todoId: Int)而在Vert.x Web中,我们通过Router对象来配置路由:
router.get("/todos/:todoId").handler(this::handleGetCertain);this::handleGetCertain是处理对应请求的方法引用(在Scala里可以把它看作是一个函数)。
Play Framework 2中的异步开发模式是基于Future的。每一个路由处理函数都返回一个Action对象(实质上是一个类型为Request[A] => Result的函数),我们在Action.apply(或Action.async)闭包中编写我们的处理逻辑,类似于这样:
def handleGetCertain(todoId: Int): Action[AnyContent] = Action.async {
    service.getCertain(todoId) map { // 服务返回的类型是 `Future[Option[Todo]]`
        case Some(res) =>
            Ok(Json.toJson(res))
        case None =>
            NotFound()
    }
}
而在Vert.x Web中,异步开发模式基本上都是基于回调的(当然也可以用Vert.x RxJava)。我们可以这么写:
private void handleCreateTodo(RoutingContext context) {
    String todoId = context.request().getParam("todoId"); // 获取Path Variable
    service.getCertain(todoId).setHandler(r -> { // 服务返回的类型是 `Future<Optional<Todo>>`
        if (r.succeeded) {
            Optional<Todo> res = r.result;
            if (res.isPresent()) {
                context.response()
                    .putHeader("content-type", "application/json")
                    .end(Json.encodePrettily(res));
            } else {
                sendError(404, context.response()); // NotFound(404)
            }
        } else {
            sendError(503, context.response());
        }
    });
}
想要使用其它持久化存储框架?
你可能想在Vert.x中使用其它的持久化存储框架或库,比如MyBatis ORM或者Jedis,这当然可以啦!Vert.x允许开发者整合任何其它的框架和库,但是像MyBatis ORM这种框架都是阻塞型的,可能会阻塞Event Loop线程,因此我们需要利用blockingHandler方法去执行阻塞的操作:
router.get("/todos/:todoId").blockingHandler(routingContext -> {
            String todoID = routingContext.request().getParam("todoId");
            Todo res = service.fetchBlocking(todoID); // 阻塞型

            // 做一些微小的工作

            routingContext.next();
});Vert.x会使用Worker线程去执行blockingHandler方法(或者Worker Verticles)中的操作,因此不会阻塞Event Loop线程。